
During my work with customers I discovered that Azure Front Door is a not-so-well known service. However, it is very valuable if you run applications that are not only distributed across multiple regions, but also used by consumers across the globe. This article takes you through the (more or less) full Front Door journey and explains how to set it up for a (very simple) globally distributed web application.
I this blog post I will focus on configuring Azure Front Door and will not cover what it is. If you need an introduction to Azure Front Door, you can get it here.
Storage Accounts with Static Websites
In the intro I mentioned that I will use a very simple, globally distributed web application. So I will keep word and show you the current setup for this demo. I prepared two storage accounts in different regions, one in Switzerland North and one in West US.

Each storage account is configured to host a static website. That’s the easiest and cheapest way to host a website in Azure. I will not go into the details here how this can be done, but you can follow this tutorial. Once everything is set up, the static website will get an URL assigned that can be used to access it.

A quick test shows that this obviously works.

Of course, for the second storage account I changed the text to “Served from the ‘West US’ region”. Now, how to setup global access/routing to this distributed website? This is where Front Door comes into play.
Deploy Azure Front Door
I create a new Front Door instance using the Azure portal. Of course this is very well possible using other methods such as the Azure CLI or Azure PowerShell. The configuration is easier than you might think. We need to configure:
- A frontend that has a URL (to accept incoming connections from the Internet)
- A backend that contains the endpoints where the traffic should be routed to (in this example I will use the static websites in the storage accounts)
- A Routing Rule that understands, what incoming traffic should be routed to wich backend

An Front Door can have multiple configurations for each of these elements. You can change this once the Front Door instance is deployed.
Frontend
Let’s start with the frontend. This needs a worldwide unique name (with the azurefd.net suffix). This is where consumers of the app will connect to. This can later be extended to use a custom domain (which normally makes sense) in case you are not happy with the default Microsoft suffix.

Session Affinity > In case incoming traffic can be routed to a backend with multiple endpoints (such as in this example), enabled Session Affinity ensures that all requests from a user are routed to the same endpoint. This might be needed for stateful applications. If disabled, Front Door might recalculate a new backend in the middle of a session (which is OK for stateless apps).
Web Application Firewall (WAF) > A WAF inspects incoming traffic up to layer 7. With that it’s capable to understand the individual requests and can analyze them to find potential attacks. We will configure this later and keep it empty for now.
Backend
The backend contains one or multiple endpoints where you want your traffic to be routed to. Every endpoint must have a name and it allows you to configure health probes that are used to check the state of the different backends. If a backend does not respond, Front Door will not route traffic to this endpoint anymore until it’s back online.
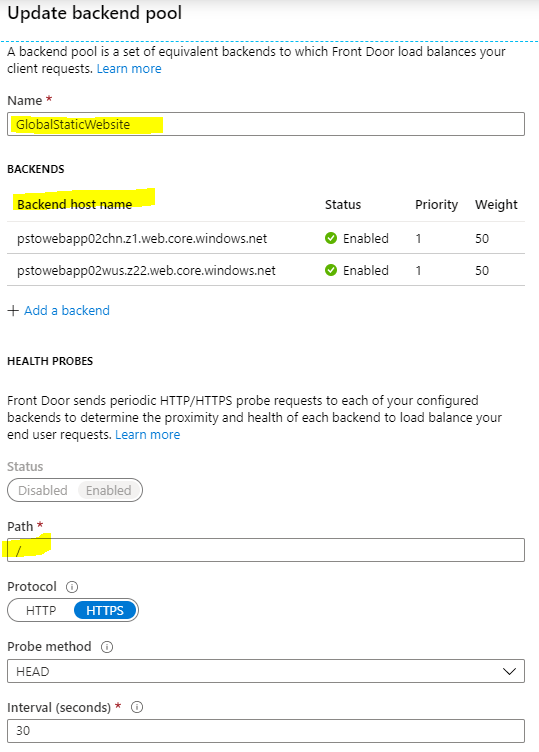
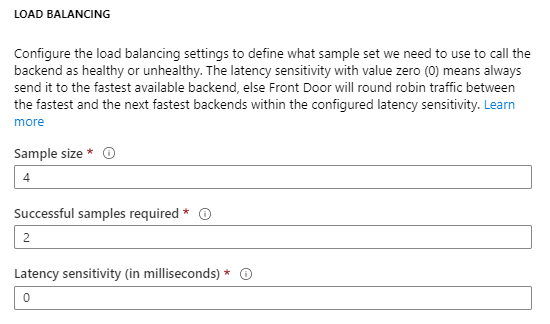
If you have multiple endpoints in the backend pool, load balancing is another very important configuration you must take care of, especially the latency sensitivity value. Each Front Door POP checks the latency for every endpoint in the pool on a regular basis. If a latency sensitivity of 20 ms is configured that means, that every endpoint with a higher latency will not be used. Instead traffic is distributed to all other endpoints based on the configured weight (shown later). If the value is set to 0, the weight value is ignored and only the endpoint with the lowest latency is used.
Now we need to add one or multiple endpoints to the configuration. Front Door supports a variety of backend host types such as Web Apps, API Management, Public IP Addresses, Storage Accounts or Traffic Manager. In this case I add two custom type endpoints that allow me to specify the URLs of my static websites. Because I have two endpoints, I will add both to the same backend pool.

Priority > The priority of this specific endpoint that allows you to either configure an active/active or active/passive configuration if you have more than endpoint in the same backend pool. If endpoints have the same priority value, traffic is distributed across the endpoints. If priorities are different, all traffic is sent to the endpoint with the lowest priority as long as this endpoint is available. If this endpoint fails, the next endpoint is used etc.
Weight > As already mentioned, this is where the weight can be configured for an endpoint. Remember if the latency sensitivity is set to 0, this value is ignored.
Status > This allows to enable/disable a backend pool.
With all of these settings you get lots of routing options to address your desired scenario.
Routing Rules
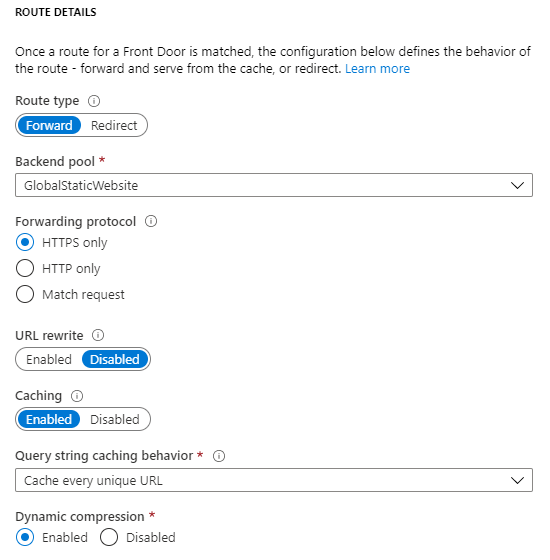
Finally we need to connect the dots between the frontend and backend configuration by configuring routing rules. Select the protocol and frontend that Front Door should accept for this routing rule. If needed, configure a path for granular control. In this scenario I will just use “/*” to accept all incoming traffic.

Next we need to define the route type.
Forward > This is the normal route type that is used to forward traffic to a backend. This is what I will use for now.
Redirect > Using this route type, incoming requests can be redirected to another URL. This is also helpful, if you want incoming http traffic to be redirected to https. I will cover that later in this post.
Next we select the backend pool for our routing rule and select the forwarding protocol which is again HTTPS in this example.
URL Rewrite > This allows the change of the URL of the original request before it is sent to the backend.
Caching > Caching alows Front Door to cache static content in the POPs which makes the experience for the consumers better. Azure Front Door uses the same POPs that are used by Azure CDN.
And that’s it. We are finally ready to complete the configuration and start the deployment. This will take a minute or two to complete.
Test Azure Front Door
Now let’s have a look at out new Front Door resource. Almost everything we initially configured in the wizard can be mofidied any time. But let’s first check if the connection works by using the Front Door URL we selected during the deployment.
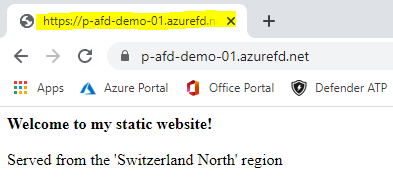
Cool, we can see that Front Door selected the endpoint with the lowest latency (Switzerland in my case). Why? Well, at the time of writing I am sitting in Switzerland and when connecting, the global Front Door Service sent me to the closest POP which is in Zurich-Switzerland. This can be seen using nslookup.

For this POP, Front Door discovered that the endpoint with the lower latency is in Switzerland North (and not West US) which is kind of obvious. I my content is now delivered from the storage account in the Switzerland North region. For a list of all Front Door POPs (same as Azure CDN POPs) check out this link.
Configure Azure Front Door
Now, there are still some configurations missing we want to dive in.
Using a Custom Domain
Everything is set up and works. But we want to use a custom domain to connect to the website. This can easily be done if you already own a domain. The bigger challenge is, that we also need a certificate to allow HTTPS traffic to that additional domain. However, this is easy with Front Door because there is a built-in functionality that requests and installs the certificate for you. If you already have a certificate ready for your domain, you can also bring it to a Key Vault and instruct Front Door to grab it from there.
So let’s add another frontend for our custom domain.

Enter the name you want to use. This requires to create a CNAME record for this name in your DNS zone to point to the Front Door public name. This needs to be configured first before you can proceed.

Then we finally want to enable this domain, use a Front Door-managed certificate for the new frontend and configure session affinity.

Before we save this, we also need to change the existing routing rule so that it processes incoming requests to the new domain. Optionally you could keep the original listener enabled, but I will not use the default URL anymore afterwards and only select the new one.

To complete this, I will also disable the original frontend.

Once the configuration is saved, Front Door will automatically request a certificate for this domain. This takes several minutes to complete, but the process can be monitored by clicking on the appropriate frontend.

Redirect HTTP to HTTPS
What if a user tries to connect to our new URL to HTTP instead of HTTPS? This would fail because we do not listen for HTTP requests. We can adress this by creating a second routing rule that listenes for HTTP requests and then just redirects this incoming request to HTTPS. That’s an easy one.
The new routing rule listens to HTTP on my new frontend only, then instead of forwarding this traffic to any backend, it just redirects it to HTTPS. That’s it.

Inspect incoming traffic using a WAF
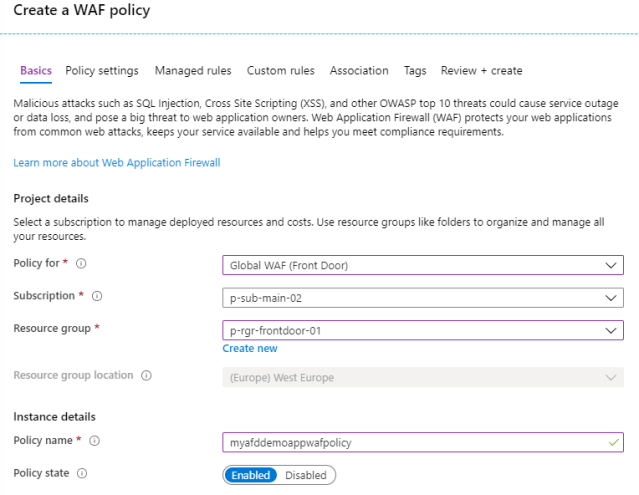
Now we also want to inspect incoming traffic at the edge. Before we can assign this to our Front Door frontend, we need to provision a new Web Application Firewall (WAF) policy. I will not go into WAF details here, but I want to show how a WAF policy can be assigned to a Front Door frontend.
When creating a new WAF policy you need to select “Global WAF (Front Door)” as the target for the new policy.
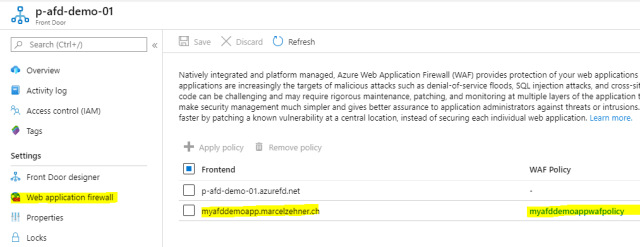
After the WAF details have been configured, you can directly assign it to the appropriate Front Door frontends.

This finalizes the configuration. You will see all WAF details on th Front Door resource now and can change them any time.
Blocking direct access
Now as we are ready with Front Door, we want to disable direct access to the websites that live in storage account. If we don’t do that, consumers that know the direct URLs could still directly access the websites and bypass the Front Door configurations and especially the WAF. So on the storage accounts we can now block all direct internet access and only allow Front Door to access them. For that you need to know, what the backend IP range of Front Door is. It’s 147.243.0.0/16.

There are other ways to block direct access, but this is just the simplest one. And with that I will finally end this article that demonstrated how to set up Azure Front Door step-by-step.
I am not sure, but I think this is the longest blog post I ever wrote. Curious if someone makes it to the very end. If so, please let me know!
Cheers
Marcel


Great post. Thanks.
Great article. I don’t see much written about front door. We are testing it right now and there seems to be some substantial performance improvements even if you use it with a single point. By the way, I found this article in my Google now feed. I was searching for front door over the weekend so I am grateful it’s popped up.
Thanks, great to hear that the article was helpful!
Made it, very good write up.
Great article! Is there any benefit of using Front Door over App Gateway? Except the fact that is serverless.
Hey. There are indeed many similarities between the two services. Beside some smaller differences, the most important one is, that Application Gateway is a regional service while Azure Front Door is a global service. If you have consumers around the globe, Front Door offers many POPs (points of presence) to give consumers “closer” access to get into the Microsoft network. Cheers, Marcel
Pingback: Managing Azure Front Door with the Azure CLI | marcelzehner.ch
Hi,
I have one question, you created your own custom domain and setup in frontends domain and in backend have you two applications with different domain.
If you login on this app : myafddemoapp.marcelzehner.ch and you are siting in West Europe, front door move you to App in West Europe, but how to make that you are still see in url address “myafddemoapp.marcelzehner.ch” not domain from region app ?
Sorry for the delay Kuba. Your endpoint is Front Door, so the user only sees the front door domain, not the domain the web app has assigned. This is “hidden”.
This is the best article on this particular setup. The other articles and documentation out there leave out some important details like exact backend configuration for static sites stored as blob (use “Custom” vs “Storage Account”? – Custom).
Thanks Brandon! Glad the article was valuable for you.
Hi Marcel. Thank you for the nice article
I am trying to setup a multi-region high available solution using AFD. My backend pool consists two app services. One is located in Southeast Asia and other one located in East Asia. I want to keep the app service on Southeast Asia as the primary site and the East Asia one as the secondary one (Active passive hot standby). If the Southeast Asia region goes down I want to move the https traffic to East Asia region. Therefore, I have given priority 1 for the Southeast Asia and priority 2 for East Asia. I have enabled session affinity as well. And also, I have setup Latency sensitivity to 30 milliseconds. However, when I run my web application, I can see that traffic goes to both regions, and session affinity also not working.
What could be the reason?
Can you try to set the latency to 0 and re-try? Also give it some time after you made configuration changes to ensure they become active before your test.
Thanks for the article – as a startup (not my first) am price conscious – The reason I am looking at FD is it hits a lot of buttons rather than cobbling together multiple services – dealing with scaling etc – It would be great to see an article dealing with the minimal secure setup , FD, static site, function app – for pricing comparing it to the cobbled approach –
Hello, Marcel Zehner. This tutorial really helped me to learn about the concepts of azure front door very easily and quickly. But I am facing a lot of trouble when I enabled the authentication and authorization in the webapps. The backend pool (webapps) URL is getting exposed when I entered the frontdoor custom url in the browser. Please help me out to resolve the issue. Thank u very much.
Pingback: Tons of Azure Front Door Health Probes | marcelzehner.ch
Thanks for the article, great information.
Great blog post, great the level of detail you provide! One question about restricting access by only allowing AFD IP ranges. This does limit access, but still allows for other Azure Front Door resources to access the storage account, also those outside my resource group. Is there a way to further limit access to the storage account so that only specific AFD instances can access it? I know Azure App Services have this possibility (see second bullet point at https://docs.microsoft.com/en-us/azure/frontdoor/front-door-faq#how-do-i-lock-down-the-access-to-my-backend-to-only-azure-front-door-) but could not find a solution to do this for storage accounts as well.
Thanks for the write up.. From security perspective, I think user can easily bypass the frontdoor and WAF by directly hitting the Primary endpoint of the static website. How is can be avoided?
Hey. You can lock down your service to only accept incoming traffic from Azure FrontDoor. Depending on your exact setup this can be as simple as restricting incoming source addresses but also supports more advanced scenarios. Check out this article for details > https://docs.microsoft.com/en-us/azure/frontdoor/front-door-faq#how-do-i-lock-down-the-access-to-my-backend-to-only-azure-front-door-. Hope this helps!
Great article. A good selection of Front Door properties discussed and highly useful for anyone delving into AFD through Azure Portal.