
My last post about Azure Front Door went through the roof, so I though to deliver some more content about this topic. In this post I will focus on how Azure Front Doors can be deployed and managed using the Azure CLI. This will also unveil some new secrets about the service that are important to understand before you start managing it in a production environment.
I encourage you to read this blog post first to understand the basics of Azure Front Door – I will not cover those in this post again.
Creating Front Doors using the Azure CLI
I assume you know about the Azure CLI and how it works. If not, check out Thomas’ blog post. This should give you a good overview how to install and use it. Before you proceed make sure you are authenticated to the correct tenant and subscription. Before you can manage Azure Front Door, you have to register/add an Azure CLI extension. Do you using this command:
az extension add --name front-door
Now let’s create a new Resource Group and a new Front Door instance with the minimum settings required.
az group create `
    --location "West Europe" `
    --name "b-rgr-demo-02"

az network front-door create `
    --resource-group "b-rgr-demo-02" `
    --name "b-afd-demo-02" `
    --backend-address "p-web-webapp-01.azurewebsites.net"
I will not use variables in the code to make the code fragments better readable and understandable. But out in the wild it makes perfect sense to use variables wherever possible.
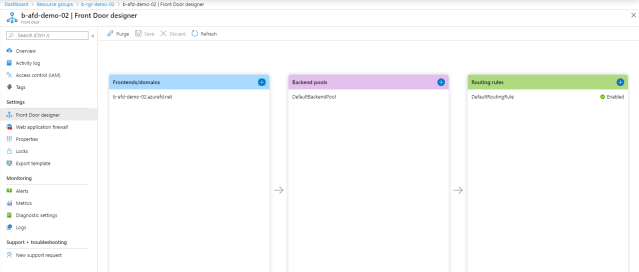
The backend address I use here is a regular, plain Web App that runs in Azure. In less than a minute you will have your Front Door ready and visible in the portal. As you can see in the designer, a frontend, a backend pool and a routing rule have been configured. However, beside the frontend name and the backend pool address, default settings have been assigned and nothing else has been configured yet.
No worries, I will show you how to clean-up all default objects in the last section of the post.
Now let’s focus on configuring the different elements of Front Door using the Azure CLI.
Frontend/Domains
First I want to use a custom domain to access my Front Door instance. You know from the last blog post that that this needs a custom DNS record. In this example I want to use the custom domain afddemo.marcelzehner.ch and so I already created the appropriate DNS record to point to my Front Door instance.
afddemo.marcelzehner > CNAME > b-afd-demo-02.azurefd.net
You can verify if this record exists using several ways, e.g. ping or nslookup. But the resource provider has this functionality build in too. And it’s available in the Azure CLI.
az network front-door check-custom-domain `
--resource-group "b-rgr-demo-02" `
--name "b-afd-demo-02" `
--host-name "afddemo.marcelzehner.ch"
If the customDomainValidated property of the returned result is true, everything is setup correctly and we can process with the deployment of the new frontend hostname.
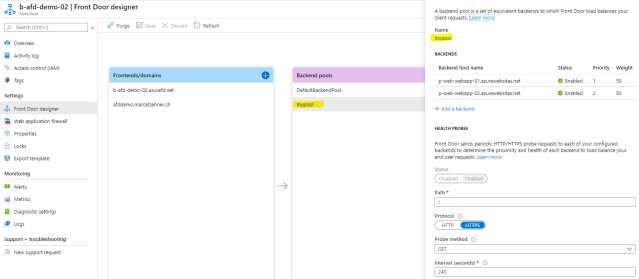
az network front-door frontend-endpoint create `
--resource-group "b-rgr-demo-02" `
--front-door-name "b-afd-demo-02" `
--name "afdemo" `
--host-name "afddemo.marcelzehner.ch"
The value for –name can be anything unique. This name will be used to reference to this endpoint, so choose it wisely. But we’re not there yet. Now we need to enable HTTPS for our custom domain. This also means that we need to specify where to get the appropriate certificate for Front Door. I want Front Door to request a new certificate for me. Check out the value for the –name property that I also used in the last command. You will not see this value in the Azure Portal. Nowhere.
az network front-door frontend-endpoint enable-https `
--resource-group "b-rgr-demo-02" `
--front-door-name "b-afd-demo-02" `
--name "afddemo" `
--certificate-source FrontDoor
And with that the frontend is ready. We still need to wait some more minutes before the certificate has been requested and installed, but we can continue the configuration process.

Backend Pools
Next is the backend configuration. We already did this in the initial deployment of the service because this is a requirement. But now we will dive a bit deeper into it. One important thing to understand here is, that a backend pool is not only one single resource. You might remember that a backend pool has probe and load balancing settings. Assigning proper values is critical for the behavior of your application. In the portal that is pretty simple, you change and save, that’s it.

If you have a look under the covers, things are a bit different. These are not just settings on a backend pool, probes and load balancing settings are resources on it’s own that are related to your backend pool. But that complexity is abstracted for you in the portal. Azure creates and relates everything for you (including the messy naming of the resources). But if you deploy Azure Front Door using code such as the Azure CLI, this is important. Why? Because you now first need to deploy a probe and a load balancer resource before you can create a backend pool (that needs those resources). There is a default probe and a default load balancer resource that you can use, but then you will need to use the default settings. So we’ll create our own resources.
Using the Azure CLI you can easily see the resources and their relationships for an existing Front Door resource. In the following screenshot you can see that this Front Door instance has one backend pool with a relationship to one probe resource and to one load balancing resource
az network front-door backend-pool list `
--resource-group "b-rgr-demo-02" `
--front-door-name "b-afd-demo-02"

With the Azure CLI you can also get details about the probe and load balancing objects.
az network front-door probe list ` --resource-group "b-rgr-demo-02" ` --front-door-name "b-afd-demo-02"az network front-door load-balancing list ` --resource-group "b-rgr-demo-02" ` --front-door-name "b-afd-demo-02"

Now let’s deploy new probe and load balancing resources.
az network front-door probe create `
--resource-group "b-rgr-demo-02" `
--front-door-name "b-afd-demo-02" `
--name "myprobe"`
--path "/" `
--interval 240 `
--probeMethod GET `
--protocol https `
--enabled Enabled
az network front-door load-balancing create `
--resource-group "b-rgr-demo-02" `
--front-door-name "b-afd-demo-02" `
--name "mylb" `
--sample-size 5 `
--successful-samples-required 3 `
--additional-latency 40
Now we can deploy the backend pool. For this example, I will use just one endpoint.
az network front-door backend-pool create `
--resource-group "b-rgr-demo-02" `
--front-door-name "b-afd-demo-02" `
--name "mypool" `
--probe "myprobe" `
--load-balancing "mylb" `
--address "p-web-webapp-01.azurewebsites.net" `
--http-port 80 `
--https-port 443 `
--priority 1 `
--weight 50 `
--disabled false
If you want to add a second endpoint to a backend pool, you can use this command.
az network front-door backend-pool backend add `
--resource-group "b-rgr-demo-02" `
--front-door-name "b-afd-demo-02" `
--pool-name "mypool" `
--address "p-web-webapp-02.azurewebsites.net" `
--http-port 80 `
--https-port 443 `
--priority 2 `
--weight 50 `
--disabled false
Routing Rules
Now it’s time to glue everything together by creating a routing rule. We need to connect the frontend with the backend pool and define the routing behavior of our Front Door.
az network front-door routing-rule create `
--resource-group "b-rgr-demo-02" `
--front-door-name "b-afd-demo-02" `
--name "myroutingrule" `
--frontend-endpoints "afddemo" `
--backend-pool "mypool" `
--route-type "Forward" `
--accepted-protocols "Https" `
--forwarding-protocol "HttpsOnly" `
--disabled false
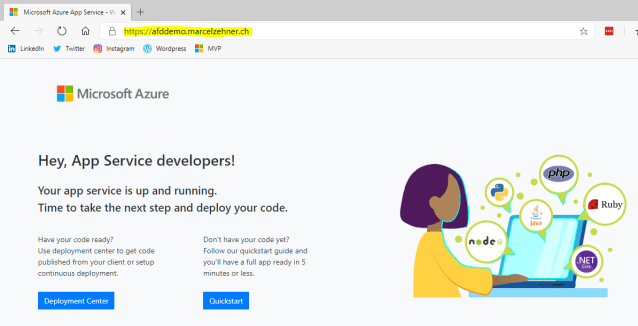
After a minute or two our Front Door access using the custom domain will work! However, the routing rule only accepts HTTPS-Traffic. If someone just enters the URL without HTTPS, it will try to connect to HTTP and fail. So let’s create a second routing rule that will forward HTTP to HTTPS automatically.
az network front-door routing-rule create `
--resource-group "b-rgr-demo-02" `
--front-door-name "b-afd-demo-02" `
--name "httptohttps" `
--frontend-endpoints "afddemo" `
--route-type "Redirect" `
--redirect-type "Found" `
--redirect-protocol "HttpsOnly" `
--disabled false
Let’s give it a try now. Guess what? It works!
Assign a WAF Policy
Everything works, but the traffic is not yet inspected by a Web Application Firewall (WAF). So let’s create a global WAF policy first and configure it as needed (I will not cover WAF policy details in this post, just the basic creation process).
az network front-door waf-policy create `
--resource-group "b-rgr-demo-02" `
--name "myfrontdoorpolicy" `
--mode "Prevention" `
--disabled False
Before we can assign the new WAF policy, we first need to find out the resource id. Then we can assign it to our frontend.
$wafpolicyid = az network front-door waf-policy list `
--resource-group "b-rgr-demo-02" `
--query "[?contains(name, 'myfrontdoorpolicy')].id" | convertfrom-json

az network front-door frontend-endpoint create `
--resource-group "b-rgr-demo-02" `
--front-door-name "b-afd-demo-02" `
--name "afddemo" `
--host-name "afddemo.marcelzehner.ch" `
--waf-policy $wafpolicyid
Done!

Clean-up
The very last step is to get rid of all default elements. This time we go from end to start and will delete the default routing rule and default backend pool.
az network front-door routing-rule delete `
--resource-group "b-rgr-demo-02" `
--front-door-name "b-afd-demo-02" `
--name "DefaultRoutingRule"
az network front-door backend-pool delete `
--resource-group "b-rgr-demo-02" `
--front-door-name "b-afd-demo-02" `
--name "DefaultBackendPool"

And that’s it with the full end-to-end coding walkthrough. With these scripts (that you need to modify and optimize for your specific needs), you should be able to configure your Front Door environment completely as code, no matter if you use your notebook or a pipeline to release the code. In one of the next posts I will also cover the process using ARM templates, so stay tuned.
Cheers,
Marcel


Pingback: Passing arrays and using loops in ARM templates – Sam Learns Azure
The article helped me a lot, thank you.
I’m trying to enable HTTPS for a certificate in my keyvault, but I’m struggling with the command:
`
az network front-door frontend-endpoint enable-https –resource-group $RG \
–front-door-name $AFD \
–name $name \
–vault-id $kv_id \
–certificate-source AzureKeyVault \
–secret-name $NN \
–secret-version $XX
`
Especially, how do I retrieve $NN and $XX using `az keyvault … `?