
When consuming cloud services, customers benefit from the pay-what-you-use billing model. That means that you only pay what you have provisioned and use. If you delete a resource, you will not pay for it anymore. This gives customers very good flexbility and cost control. However, what if you know that you will have some workloads such as virtual machines running in Azure for a long time? For those cases you can reserve capacity for one or three years upfront and get a financial discount. In Azure this is called ‘Reservations’. Many people know that reservations exist in Azure, but only few actually ever configured and used them. This walkthrough gives you some insights.
In this blog post I will purchase and configure reservations for pay-as-you-go subscriptions. The process is a bit different for other purchasing models such as CSP.
Purchase a reservation
I will first check if I already have any reservations in my Azure environment. If you search for “Reservations” you will immediately end up in the correct spot.

In my case I don’t have any reserved capacity, so I will create a new one. As you can see, reservations are not only available for virtual machine capacity, but also for other Azure services. For this post however, I will focus on virtual machines.

Once I selected the service/product, I now need to configure my reservation purchase.
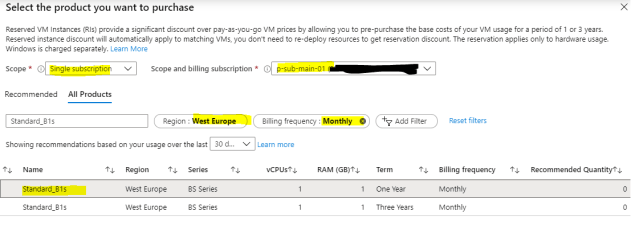
Scope
The scope defines, where the reserved capacity can be used later. The capacity can be shared across multiple Azure subscriptions (shared), can be assigned to a single Azure subscription (Single Subscription) or can even be assigned to a single resource group in an Azure subscription (Single Resource Group). If you are unsure what to choose, start with a single subscription. This selection can be changed later if needed.
Product
Select the product you want to purchase. In this case I selected Standard_B1s. If later a new virtual machine will be deployed using Standard_B1s, it will automatically use this reserved capacity.
Region
The reserved capacity is bound to this region and is only available for virtual machines I will provision in this region.
Term
Another important selection is the duration of the capacity reservation. This can be one or three years. Obviously, if you make reservations for three years, the discount you get is even higher. There are options to make changes or even terminate the reservation (or parts of it) earlier, but this normally comes with a penalty.
Billing Frequency
The billing frequency allows you to make a payment upfront or split it into monthly, smaller amounts.

The last step is the quantity. Enter the amount of instances you want to reserve for you. In this demo I select 2. After that the reservation is created. This normally takes a minute or two to complete.
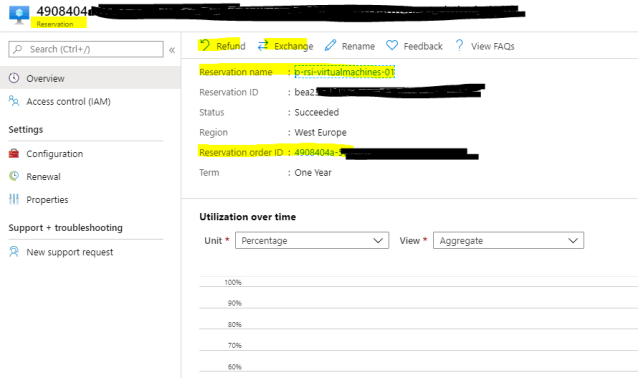
Now what happened in the background? This is important to understand to be able to properly manage your reservations later. When a reservation is purchased, two objects are created in your Azure environment:
- A Reservation > The reservation contains all details about the purchased reservation such as the type, the size, the duration, scope or scope. This is what we just entered in the wizard and purchased. It’s the effective capacity.
- A Reservation Order > This is a logical group of one or multiple reservations and used for billing, it’s a non-technical object. Right now my reservation order contains one single reservation object with all the capacity I ordered. But this can change because Azure allows us to split, return or merge reservations later. So a reservation order can indeed have multiple reservations. We’ll have a look at this in a second.
Manage your reservation
OK, now we obviously have some capacity reserved and available. Now let’s have a look what configuration options are available. If you select a reservation you can now configure it and set the proper reservation scope and optimization settings.

Scope
We already covered the scope when we purchased the reservation. But here you can reconfigure the scope if needed.
Optimized for
You can configure a reservation for instance size flexibility or capacity priority.
- Instance flexibility > Microsoft offers flexibility groups that contain different types and sizes of VMs. This gives you additional flexibility to slightly change the VM type/size and means, that you don’t have to stick with the type/size you purchased. The reservation discount will only apply to types/sizes in the same flexibility group. The available groups are documented and the options you get are visible in the portal. Make sure you don’t forget to calculate the ratio if you go for a larger/different instance.
- Capacity Priority > This only works is the scope is configured for a single subscription or a resource group in a subscription. This can only be used for exactly the type/size you purchased and gives you priority over the reserved capacity in the appropriate region.
Using this link you can check out the available flexibility groups. The yellow marked flexibility group show the same members that are visible in the above screenshot and gives me some additional information about the convertion ratio.

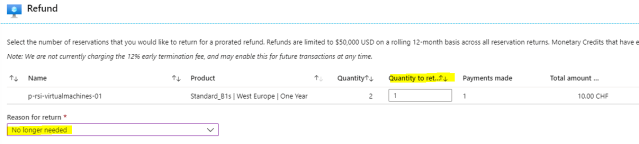
Refund & Exchange
You can refund or exchange reserved capacity if needed. This normally comes with a penalty, so make sure you understand what this will cost before you execute.
Using refunds you can return a specific quantity you don’t need anymore.
Exchanging means that you change the type/size against something different. This is a 2-step process where you first return capacity and purchase new one in one single go.
Split & Merge
Another thing you can do is split (or later merge) reservations. Let’s say you purchased a capacity of 20, but now want to distribute those across multiple subscriptions and also use different configurations for them. This is not possible with a single reservation. But after splitting, this is indeed possible because you will have multiple reservations, each with it’s own configuration. For now, the portal does not allow splitting reservations, so I will show this using the Azure CLI (PowerShell would also be possible). After proper authentication you can follow these steps.
az reservations reservation-order list
This shows the reservation orders and their related reservations (in this example, there is only one reservation in my reservation order).

az reservations reservation list –reservation-order-id xxxxxxxxx
Using this command gives you all details about the reservations in your reservation order. This is where you can see the quantity, type/size and all other details.
az reservations reservation split –reservation-order-id xxxxxxxxx –reservation-id xxxxxxxxx –quantity-1 1 –quantity-2 1
This command finally splits a specific reservation from a specific reservation order into two reservations with specified quantities. In this case I have a reservation with a quantity of 2 that I now split in 2 reservations with a quantity of 1 for each. After this is done, you can see the change in the portal. The reservation order now shows 3 reservations: the original reservation that is now cancelled, and 2 new reservations with a quantity of 1 each. Those can now be individually configured, assigned, renamed and managed.

If needed, you can also merge back multiple reservations using the Azure CLI or PowerShell.
az reservations reservation merge –reservation-order-id xxxxxxxxx –reservation-id-1 xxxxxxxxx —reservation-id-2 xxxxxxxxx
Auto-Renew
Finally to make sure you don’t miss the renewal time and need to pay more for your services, you can configure auto-renewal of your reservations if needed.

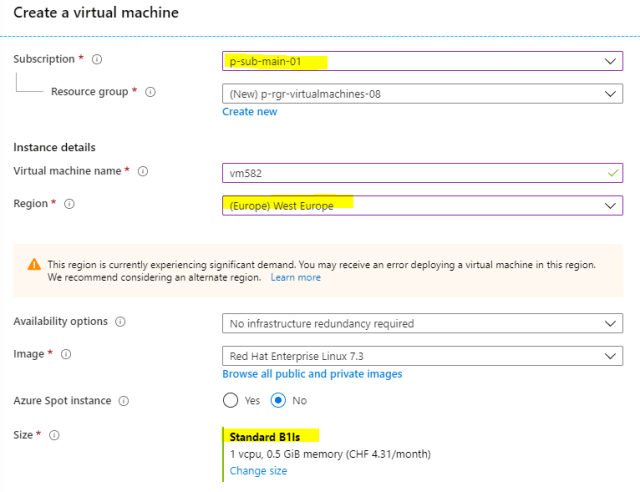
Use reserved instances
Now after all the configuration has been done it’s finally time to use our reserved capacity. But how? Well, that’s the easiest part of all: You just provision a new virtual machine and depending on the selected subscription, region and vm size, reservations are automatically assigned and used. Let’s see if that is true.
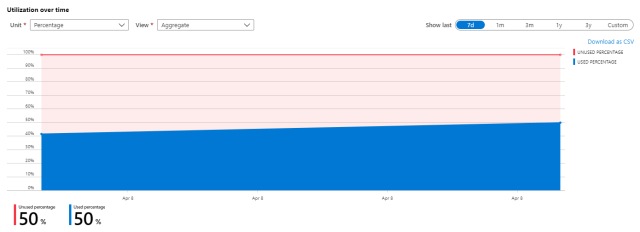
Done. Now give it some time (hours) and the chart for your reservations will update. You will see how much of the reserved capacity has been used and how much is still available.
OK, now how much can I save?
This depends on many factors, but it can be a lot. Using the official docs and calculator gives you some more insights on potential savings. It’s definitely worth having a closer look at reservations! Now have fun spending (or saving?) money!
Cheers,
Marcel


Can you automate this all process using PowerShell or rest API? Would love to see how you tackle this.
Hey James. I never worked on such a process, but yes, I theory this should be possible. If you start investing in this I’d love to get some insights into your work! Cheers, Marcel
Hi Marcel,
Can the reservation be scoped to the VM level. We want to buy reservation for a limited number of VMs in the subscription
Olu
Hey. Reservations can be scoped at subscriptions. You would need to split the VMs across multiple subscriptions if you don’t want all VMs having access or using your reserved capacity.
interesting article. MS states any purchases will be auto applied to existing matching VM’s… See the below article – Any ideas? how would you go about reservations for new vm’s only
https://docs.microsoft.com/en-us/azure/cost-management-billing/manage/understand-vm-reservation-charges
Azure Portal statement –
“Reserved VM Instances (RIs) provide a significant discount over pay-as-you-go VM prices by allowing you to pre-purchase the base costs of your VM usage for a period of 1 or 3 years. Reserved instance discount will automatically apply to matching VMs, you don’t need to re-deploy resources to get reservation discount. The reservation applies only to hardware usage. Windows is charged separately”