
If you are working with Azure and especially IaaS, you might know that designing and building a virtual network can become a challenge. Lots of differents parts must work together to have a secure, fast and solid network and routing infrastructure for your services – in Azure and for hybrid connectivity. If you have multiple offices you want to connect, it gets even more complex. But thanks to Azure Virtual WAN, this might be easier than you think!
This first part of the post will guide you through the full setup and configuration of Azure Virtual WAN. I will not cover the very details how VWAN works. If you want to learn about the basics check out this article.
My Demo Setup
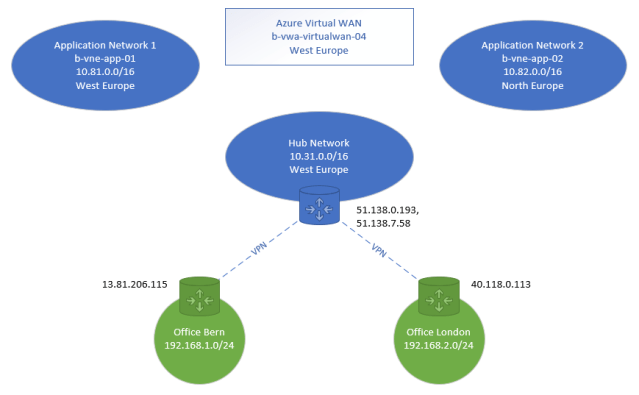
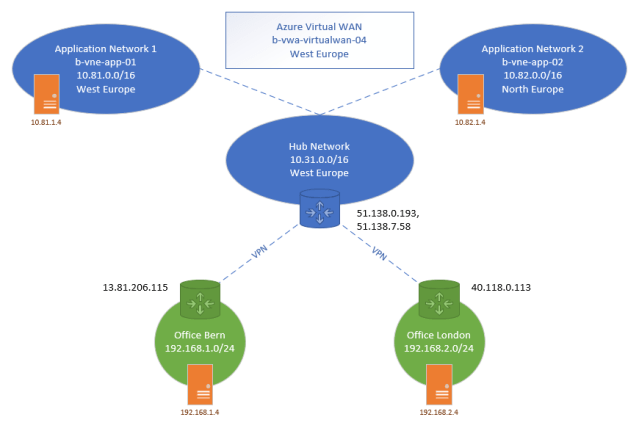
My environment now looks like this:
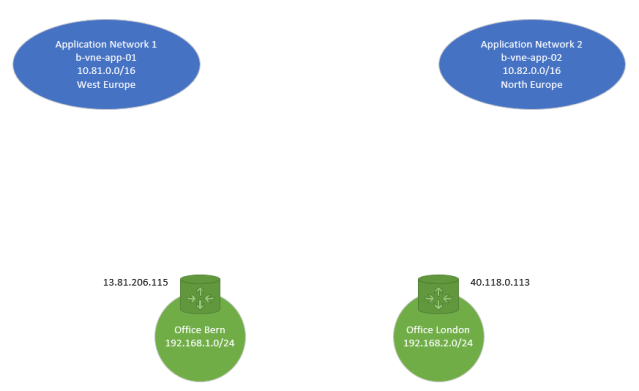
On-Premises
I have two offices that each use a simple IP adress space.
- Office Bern
- IP Range 192.168.1.0/24
- Public Gateway IP Address 13.81.206.115
- Office London
- IP Range 192.168.1.0/24
- Public Gateway IP Address 40.118.0.113
These are the two offices I want to connect using Azure VWAN. And of course, the offices also need to reach resources that live in Azure and vice versa.
In Azure
In Azure I already prepared two networks that contain some servers. Other than that, nothing is configured.
- Application Network 1
- b-vne-app-01
- IP Range 10.81.0.0/16
- Region West Europe
- Application Network 2
- b-vne-app-02
- IP Range 10.82.0.0/16
- Region North Europe
Curious how this can all be connected using Azure Virtual WAN? Read on!
Hub & Spoke Architecture
A common network architecture in Azure is the so-called hub & spoke model. This uses a star scheme to connect multiple application networks through a central core network. The core network has all the shared components that are offered to the application networks, such as a VPN/ER connectivity to your on-premises offices or a Layer 7-Firewall to inspect traffic that is routed to or from the app networks or the on-premises office. With that, there is no need to build this functionality multiple times in the application networks.
Implementing this model needs some serious planning to ensure it really works smooth. Not only do you need to think about the exact routing of all your network traffic, you also need to peer your networks and configure proper network traffic filtering. This can be a challenge, especially in more complex environments. Using Azure Virtual WAN uses the hub & spoke model too, but configures most of the settings for you. Not only that: it also gives you addidional features such as connecting multiple on-premises sites with routing through the Azure Hub Network or the existance of multiple Hub Networks in different regions that might be connected. Let’s have a closer look.
Deploy the Virtual WAN
Everything is ready, so let’s immediately start with deploying a Virtual WAN resource.
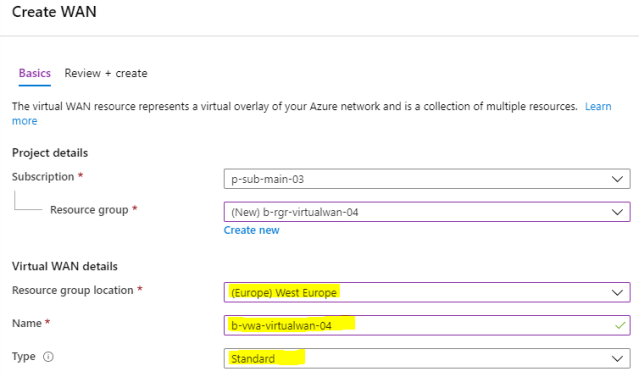
Name > Give the VWAN a meaningful name.
Type > VWANs can be of type Basic or Standard. Basic only offers very basic connectivity options using S2S VPN. Standard offers much more flexibility such as Express Route, P2S VPNs or Hub-to-Hub scenarios that allow you to grow globally. You can change the type later from basic to standard (not back).
After a minute the virtual WAN resource is ready and can be configured.
Virtual Hub (Hub Network)
The first step when configuring a VWAN is to create a virtual hub (or the hub network). Beside giving the virtual hub a name, you must also specify the address range you want to use. This is no different than creating a regular virtual network – make sure that there is no IP range overlap with other networks you want to route traffic to/from.
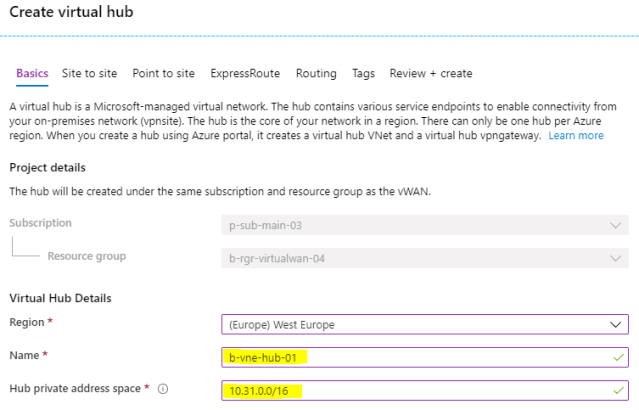
For now we do not configure anything else such as VPN, Routing etc. Just use all default settings that do not enable any services in the virtual hub. We will dive into those later.
What this does behind the scenes?
A new virtual hub has been created. It will act like a hub network, but it’s not a regular virtual network resource but a virtual hub resource because it is managed. You can see that new hidden resource in the resource group where the Virtual WAN resource lives.

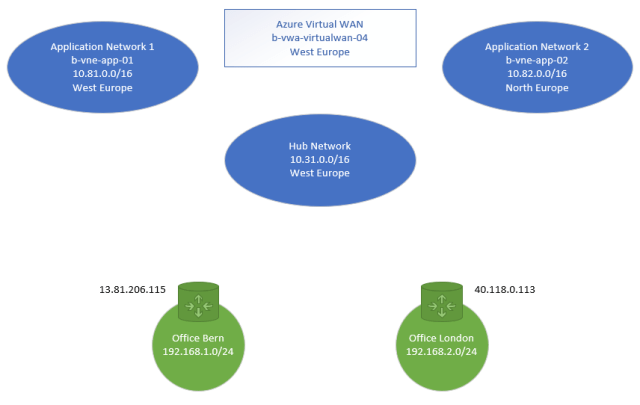
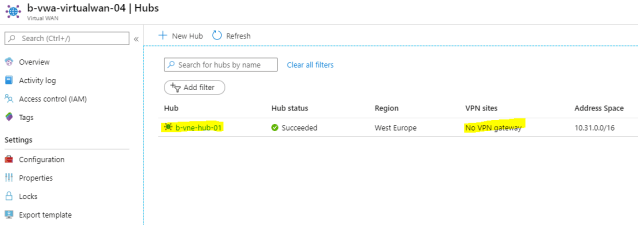
My environment now looks like this:
Connect On-Premises Offices
Let’s now prepare the Hub Network to connect our offices to it. This can be done using S2S VPNs or ER. I will use VPN for this walkthrough and therefore need to deploy a VPN Gateway in the hub network.
Depending on the exact needs (throughput & availability) you can select from different VPN Gateway scale units. This then takes 30+ minutes to deploy, so give it some time.

What this does behind the scenes?
This takes a long time and deploys a hidden VPN gateway resource with a public IP address that we will use as endpoints to connect our on-premises offices to. You can see that new hidden resource in the resource group where the Virtual WAN resource lives.

Now I can prepare the connection to the on-premises offices. On the Virtual WAN resource I create a new VPN site for my first office. I need to give it a name, the local IP address range and the hub network I want to connect to.
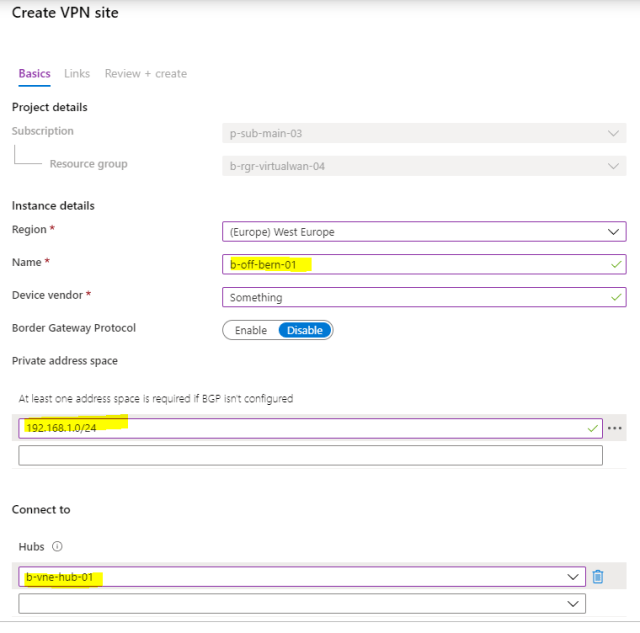
Important: Instead of manually configuring the IP ranges, I could use BGP – a dynamic method to exchange routes between routers/gateways. I will go dive into this here and just go with the manual configuration.
To finalize the configuration I need to add some more details about the on-premises device and connection. The most important information here is the public IP address of the local gateway.

That’s it. I repeat this for the second office and am ready for the next steps.
What this does behind the scenes?
This again creates hidden resources, this time of type ‘vpnsites’. They represents the on-premises offices and contains all connection details for connecting the virtual hub with the local vpn gateway.

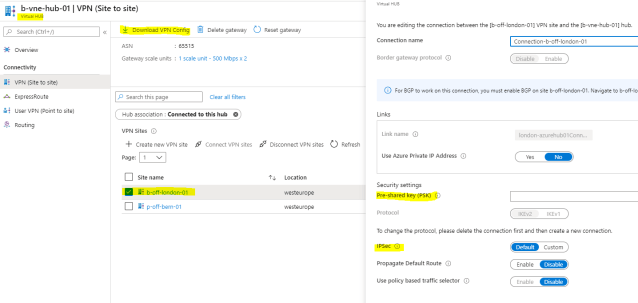
Now of course we need to finalize the VPN setup by configuring the local VPN devices. First we need to find out the public IP addresses of our virtual hub VPN gateways as well as the configured pre-shared IPsec key. The configuration file can be downloaded for the different sites and you can configure settings for every single office connection (such as the IPSec PSK, IKE version etc.).
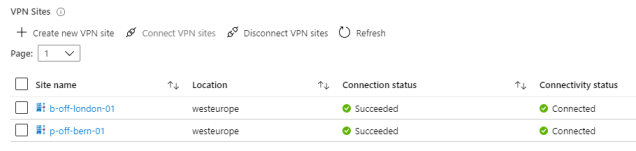
After everything is set up, the connections should show the status ‘connected’.
The VPN Connections are up and we are ready for the next step. Our environment now looks like this:
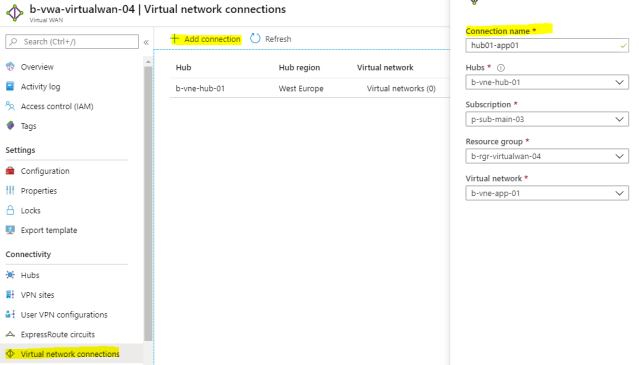
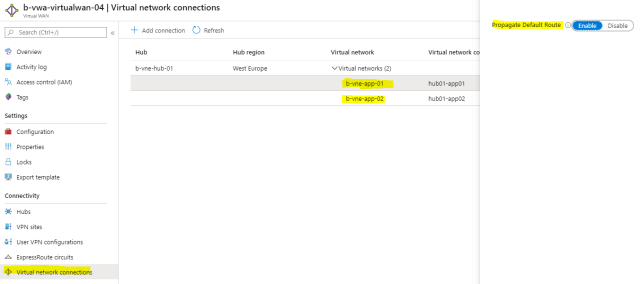
Application Networks (Spoke Networks)
As I mentioned in the intro, these network have been pre-created in Azure already. These are totally plain networks without any configurations and only an IP address range and one subnet each. No specific configuration has been made nor are they in any way related to the Virtual WAN yet. To connect these application networks to the hub network we would normally create and configure virtual network peering and route tables. But in this case, Virtual WAN handles this for us. We just need to connect the networks and are (almost) good to go.
What this does behind the scenes?
This connects the networks using virtual network peering configurations. It also configures all relevant settings on the peering configuration for us automatically, e.g. the app networks to use remote gateways.
IMPORTANT: If you spoke network is in a different region than the hub network you might run into an error.
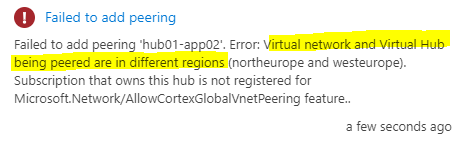
To make this work you first need to register a specific resource provider feature on that Azure subscription.
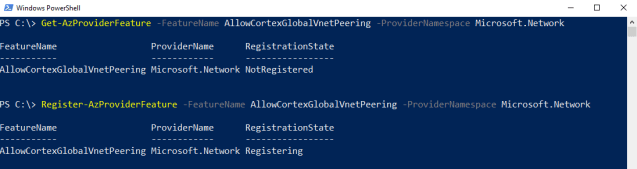
Check if the feature registered on your subscription > Get-AzProviderFeature -FeatureName AllowCortexGlobalVnetPeering -ProviderNamespace Microsoft.Network
Register the feature on your subscription > Register-AzProviderFeature -FeatureName AllowCortexGlobalVnetPeering -ProviderNamespace Microsoft.Network (takes several minutes to register, check is the status changes from “registering” to “registered”)
After the registration, you need ro re-register the Microsoft.Network resource provider.
Register-AzResourceProvider -ProviderNamespace ‘Microsoft.Network’
Now you can connect virtual networks from any Azure region to your Hub Network. Once done you should see the connections.

Our environment now looks like this (this time I also added the servers I deployed so you better follow the upcoming connectivity tests):
Check Connectivity
Now we should be ready to test the connectivity through Azure Virtual WAN.
Explore Traffic Routing
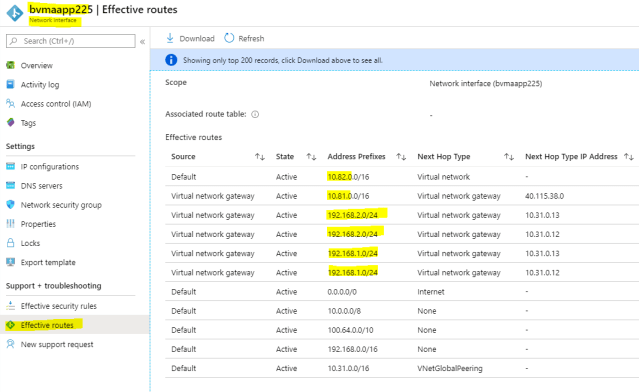
Before the most exciting part – the effective tests – it’s important to understand why and how this actually works. Azure and all involved parties need to understand what networks exist, where to sent traffic etc. Let’s have a look at the Azure-Networks first. In Virtual WAN you can configure, that routes the virtual hub knows are propagated to the connected application networks. This can be enabled/disabled per network.
With route propagation enabled for both connected virtual networks, both application networks should now know about the other application network and understand that they need to route this traffic to the virtual hub. This can be easily seen on the network interface of a server that is connected to one of the application networks. On the effective routes you can see that the NIC not only knows about it onw network, but also learnt where to send traffic to the other application network and the two on-premises offices.
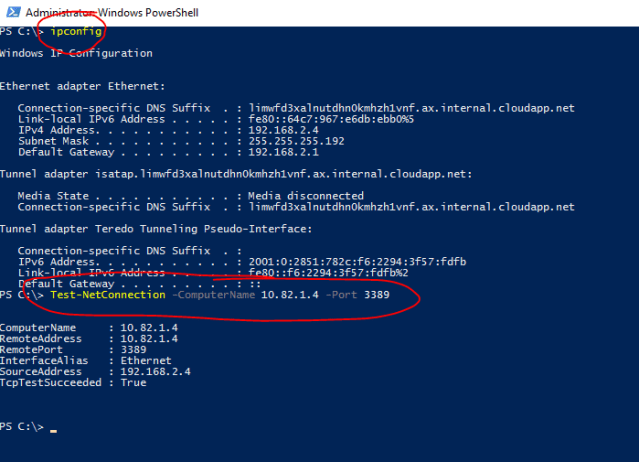
Test 1: Office “London” to App Network 2
Let’s now check if the connectivity from on-premises office “London” all the way up through the VPN tunnel to the virtual hub and then further up to the connected application network 2.
- Source IP: 192.168.2.4 (Server in On-Premises Office “London”)
- Target IP: 10.82.1.4 (Server in Application Network 2)
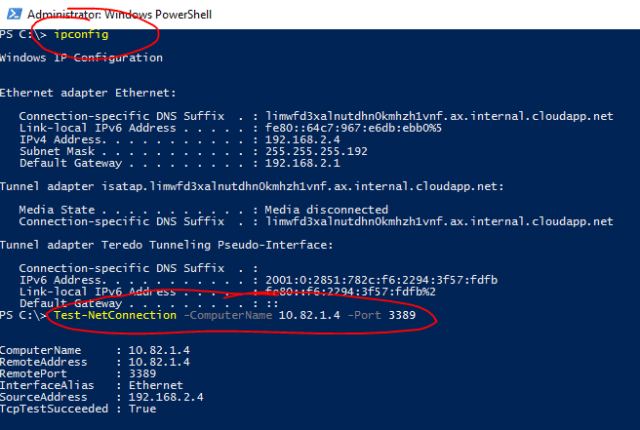
Obviously that works! Cool!
Important: In case you have any NSGs or other firewalls blocking the way make sure these are configured properly to allow the communications you are testing.
Test 2: Office “London” to Office “Bern”
Now comes the more exciting part, the test for the branch-to-branch connectivity through the Azure virtual hub. Before we test we neeed to ensure that this kind of communication is allowed through the virtual hub.
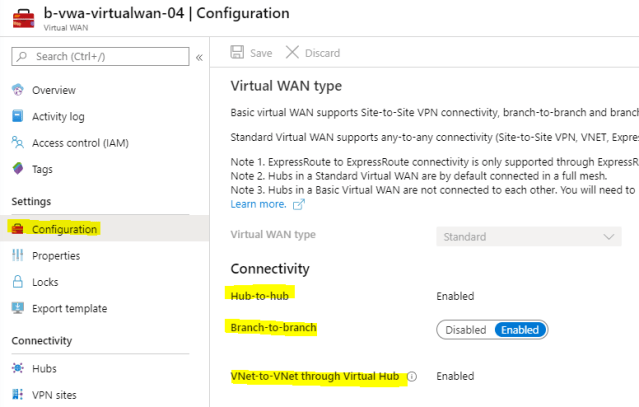
Important: Make sure that both offices know how to route traffic to the other office (to the virtual hub).
Now I am sitting on a server in “London” and try to connect to a server in “Bern”. Remember, this traffic now goes through the Azure virtual hub.
Guess what? This also works! And with that I am going to end this blog post about Virtual WAN. It’s an exciting service that takes lots of load away from you because you can benefit from automatic configurations that the service does for you.
But wait. Some parts are still missing. What about security? What about filtering all of this network traffic before it gets forwarded? I will cover this in the next part of the Azure Virtual WAN series, so stay tuned!
Cheers
Marcel


Great article Marcel…..any ETA on Part 2? 😁
I know this is a little bit delayed 🙂 I hope to find some time soon!
Will there be a part 2 eventually ?