
Azure Security Center (ASC) is your main stop when you need a first broad overview of your environment’s security posture. If there is potential to improve your overall security, ASC will give you recommendations that explain how a specific resource can be better protected. In addition to that, you can use advanced security features that assist you to detect and protect against threats. Those features bring additional intelligence to the show (think of machine learning) and help you make easier decisions to drive security to the next level.
This post will just focus on ASC workflow automation. For a full documentation of Azure Security Center check out the official Microsoft docs here.
Blog Post Scenario
The scenario for this post is simple. We want to be notified whenever a threat is detected. No matter what resource is affected or what the severity of the threat is, we just want to know as soon as a threat is reported. I will demonstrate the process using the Azure Portal, but of course this can be done as code too.
Azure Logic App
ASC workflow automation uses Azure Logic Apps in the background. They are triggered when specific conditions are met. So let’s start by creating our notification logic app using the Azure marketplace.

Once deployed, navigate to your Logic App. Select the “Security” category. Some templates are displayed. Then select “Set a notification email when Security Center detects a threat”. This is the easiest way to start. If you are a bit more experienced you can of course also start with a blank template and build this from scratch.

Depending on your environment you might need to authenticate the Security Center and Office 365 connectors first so that the Logic App can talk to these “foreign” services.

Because we selected a template, everything is preconfigured and can be changed now. As you can see, the Logic App has 2 steps now.
- Trigger: When an Azure Security Center Alert is created or triggered
- Action: Send an email
I think it’s pretty obvious what those steps are doing in sequence. The first step defines how the Logic App is triggered it will publish details of the triggering alert to the flow that can be used by later steps. The second step then sends the email. You must add a recipient address and can then change the subject and body details. The body uses dynamic content that is published by the triggering threat. You can totally change this as needed, but for this post I just use the default settings.

And that’s it. The Logic App is ready. Let’s have a look at the resource group where the Logic App lives now to get a little bit of background information. You should see 3 resources now.

- The Logic App itself that contains the workflows.
- 2 connectors that you configured in the very beginning. They represent the connection to Azure Security Center Alerts (ascalerts) and to Office 365 to authenticate before emails are sent (office365).
Azure Security Center
We now need to configure Azure Security Center to trigger the Logic App when a new alert is generated. This is done by adding a new workflow automation in the appropriate menu.

Give it a meaningful name and description. Then select the subscription and resource group where you want to store the configuration. Now it’s time for the conditions.
- Select Security Center data types: Threat detection alerts (triggers when new alerts are created).
- Alert name contains: empty (any alert should trigger this notification so I leave it blank. You could also select specific keywords of alerts, e.g. when you want to notify different teams based on the alert name. Check out the ASC alerts reference here).
- Alert severity: I selected all (low, medium, high).
Finally select the Logic App that should be triggered. This is the one we prepared in previous step.

Save and check the new workflow automation, then make sure it is enabled.

Let’s see what happened in the background by navigating to the resource group you selected. If you make the hidden resources visible you should see a workflow automation resource.

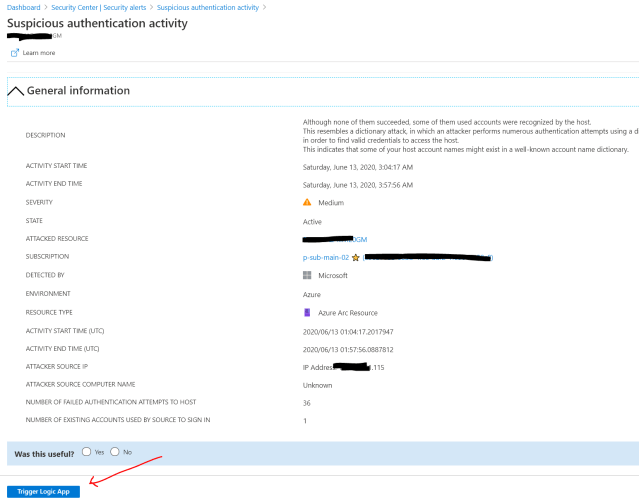
Manual Test
Now everything is ready and there are 2 ways to see the result. Either you just wait until a new threat alert is generated, or you trigger the Logic App manually from an existing alert. First, we will trigger the Logic App manually, but that only works if you already have some threat alerts.

After analyzing the details I can now trigger a Logic App manually by hitting the button at the bottom and then select the Logic App. This does not proof that our workflow automation really works and the Logic App will get triggered next time a new alert is logged, but it can still be used to easily test the Logic App from ASC.

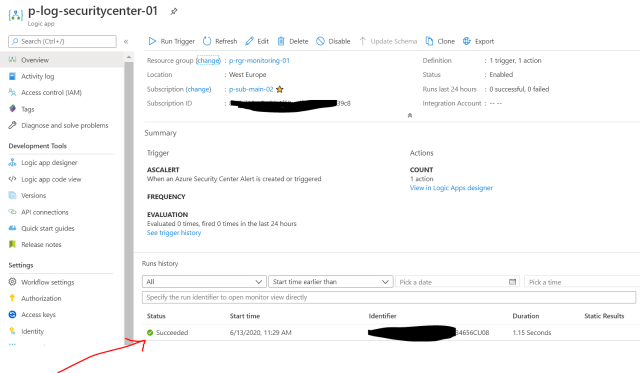
After a while you should see the notification in the configured recipient’s inbox.

Back on the Logic App you will also see that it has been triggered and the run was successfully.
Real Test
For a real test you can either wait until a threat alert is generated or you can create a test threat alert yourself to force the process. If you have a virtual machine that has the Microsoft Monitoring Agent installed and is connected to a Log Analytics workspace that is managed by ASC, then you can easily generate a test threat alert. Here is how:
- Copy calc.exe to some other directory, e.g. “c:\temp”
- Rename the file from “calc.exe” to “ASC_AlertTest_662jfi039N.exe”
- Open PowerShell, navigate to the directory with your renamed exe-file and start this > “ASC_AlertTest_662jfi039N.exe -asctest”
- This opens calculator
- The process will generate an alert because Windows checks if exe-files are started with parameters that are unused (arguments auditing must be enabled for this which is the case for newer versions of Windows)
For all details about testing Azure Security Center see this page.

A threat alert is created and the Logic App should trigger automatically.
This is a simple-to-follow example how workflow automation can be configured in ASC. Of course there are much more powerful automations than just notification. Be creative!
Cheers,
Marcel


Pingback: System Center Haziran 2020 Bülten – Sertaç Topal